header

Tuesday, 26 June 2012

Red is the Colour

Here are another two pages, yes two pages, of my daughters scrapbook that I have managed to get done in the last few days. This is  despite all the other stuff I have had to do in the past two weeks, finishing off moving all the furniture having redecorated our hall and landings, preparing all the bits for my daughters house move in Leeds and loads of gardening. Oh yes and going on a Cupcake decorating course. Well I do love to be busy its fun. I'm also going to Plymouth for a couple of days this week prior to  going to Leeds for the big house move. 

Well here are the two pages, she likes them thank goodness particularly the school page as I incorporated her school uniform colour and daisy emblem on the page.
Bryony with her brother

Ribbon bunting I tacked on using staples I like this look


The second page is of  the Revels which is our local fair we have each year and all the school enter floats etc This year we had entered a float based on the Addams Family. I had actually designed and created the float along with a group of helpers it was great fun ,we won the cup and even appeared in  the local newspapers
   
Bryony so wanted to be involved even though they she and her brother were not allowed on the float itself as it was only the year six children allowed this privilege. Bryony went as Morticia Addams and Toby as a vampire count.  I can tell you it took ages to make their costumes and Bryony's wig which I made from a black dustbin bag was fab but really tricky to make and I understand hot to wear.


I pleased with both pages, but what do you all think?

Monday, 25 June 2012

Cup Cake Crazy

Yesterday my daughter and I went on a cupcake decorating course which was great fun, messy but fun. As it was all about the cake decoration we had to make our cup cakes the previous day, ready for decorating the following day. I made standard vanilla cup cakes ( I know boring)  and my daughter make some chocolate ones. You will see below I have given the standard recipe for the cup cakes but if you want the chocolate ones you merely have to add 4 tbsp Cocoa Powder and 1 tbsp Natural Yogurt to the basic recipe.

Ingredients 

200 g Plain Flour
2tsp Baking Powder
200g Caster Sugar
100g Unsalted Butter
3 Eggs
150ml Milk
1tsp Vanilla Extract.  
   

Method

Pre heat oven to 180C, 350F or Gas mark 4

Place flour, baking powder, caster sugar and butter into mixing bowl and mix to create a mix like fine bread crumbs 


Mix eggs, milk and vanilla extract together then add gradually to the dry ingredients mix thoroughly to make a smooth batter.


Place mixture into bun cases. Do not over fill cases, its best to fill only about half to two thirds of the way   

Bake in oven for approx 20 - 25 minutes check to make sure cook by pressing top if it springs back they are cooked. 

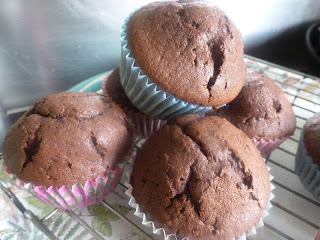
Vanilla ones above chocolate below

Now we had the cupcakes we only had to decorate them. Here is what we did with the above basic cupcakes 

We made a cookie monster
Pale pink moulded rose
Violet rose hand crafted
White Rose
 I was very pleased with the finished results and the techniques we learned. I think the Rose idea will definitely see action again next Valentines Day, if not before.  

Saturday, 23 June 2012

Blooming Lovely

Just thought I'd share a few shots of my garden and to keep you posted as to how my potatoes etc are coming along since my earlier post. I hope you all like the pictures I am thrilled how everything is growing so well. We did, and I think still do have a hose pipe ban in this area, but since its rained so much I haven't had the problems I thought I might maintaining the garden. You know watering it with a watering can. As you can see everything is doing great.

The area of the garden my husband calls his 'Happy Place'
 

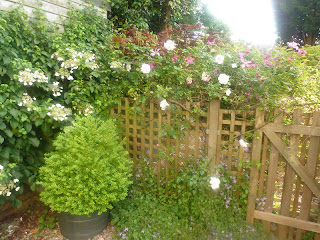
My New Dawn rose and clematis are doing fabulously together 
After a slow start the Arum Lilies are looking great
 The vegetable patch, particularly the potatoes are growing great guns

The potatoes I have 8 plants I hope I get a lots of spuds later.last year I grew them in bags and despite loads of potatoes they were all small. Hopefully more space bigger spuds. 

Just a few of the  tomatoes grown from seed. I have also got some cucumbers 

Friday, 22 June 2012

Madness in New York

My son has just got back from New York where he had a fabulous time and since I'm always putting picture of my daughter on my blog I thought Id share a picture of my son with you all He looks so happy.


Wednesday, 20 June 2012

Pecan Pie

This pie is scrummy and a big favourite with my family. Due to the high calorie count I don't cook it very often, it just so moreish, one bit never seems to be enough.

Pecan Pie Ingredients 

1 pkt Sweet Short Crust Pastry
150ml Maple Syrup
60g Butter
175g Brown Sugar 
2 drops Vanilla Extract
3 eggs
250g Pecans 
  

Method

You can make your own pastry should you wish but I cheat and buy ready made. My reasoning is why bother when shop bought is just as good. However if you want to be a pureist please look on line for a pastry recipe.

Pre heat oven 180oC 350oF or gas Mark 4
   

Roll out pastry with care to about 3mm thick and place in pie dish.
Prick base of pastry and cook blind for approx 20 minutes until pastry has begun to cook make sure base is not sticky before placing in filling.

To cook blind place grease proof paper over flan base and add baking beans or some weight to keep pastry in place when cooking Remove baking beans and just allow 2 minutes of further cooking time to allow base to cook
Make filling pour maple syrup butter and sugar into a pan and heat gradually until butter has melted and sugar dissolved   


Allow mixture to cool slightly before adding beaten eggs gradually 


Once eggs are mixed in then add pecans. leave a few pecans out of mixture to arrange on top of pie  as seen in picture below 


Place mixture in pie case and place on a baking tray
Place in oven and cook for approximately 40minutesd checking to ensure it does not over cook.

Can be eaten hot or cold, lovely on its own or with cream or ice cream.

The finished article

Be warned this is delicious and can become addictive

Tuesday, 19 June 2012

Jambalaya

This recipe originally came from a low cholesterol cook book but what I make now bears no comparison to that original recipe well other than the fluid to rice ratios, You definitely couldn't call it low cholesterol that's for sure.It is though a great family favourite, especially  good on cold winter nights but also equally good on cold dreary wet summer days, such as we've been experiencing recently. Anyway this weekend my hubby made a special request for Jambalaya and Pecan Pie for Fathers Day. Here is my recipe for Jambalaya and next post it will be the Pecan Pie 

Ingredients

400g Long Grain Rice
1lt Stock (Chicken or Vegetable)
1 Large Red Onion 
1 Small White Onion
1 Sweet Red Pepper
4 slices of Sun Dried Tomato
2 tbsp Oil
1 tsp Paprika 
1 tsp Garlic Pepper
1/2 tsp Flaked Chillies
2 Drops Tabasco
4 level tsp Tomato Puree
115 g Chopped Chorizo Sausage 
6 Cooked Chopped Pork Sausages
75 g Peas 

Method 


Chop onions and peppers and gently fry/cook with garlic pepper, paprika, sun dried tomato and chillies in non stick sauce pan until they are soft.
  
Oil with chillies and paprika
 
Chopped veg

Chopped sun dried tomatoes

The Vegetables all gently fried
 
Add rice and stir then add stock, tomato puree and Tabasco Simmer in pan for 10 minutes with  no lid.

Stock

Rice

Add sausages  chorizo and peas and cook through gently for about five minutes      
   
Chopped Chorizo and Sausages


Serve in bowls with garlic bread or a salad makes a delicious meal


Friday, 15 June 2012

Things to do with an Axe

When looking through photos to include in my daughters this is your life book I found this shot and I thought it is a must. Its the face of innocence appearing to be armed to the teeth with an enormous axe. It makes me chuckle.


 To create this page I used a sheet of basic blue 12 x 12 card which I distressed around the outer edges using Tim Holtz Distress inks in blues and greens. I then cut strips of assorted scraps of blue patterned paper I had in my stash some from Stampin Up series and others from Papermainia series. I cut these 10" long strips in a wedge like shapes and then layered them one on top of the other at the bottom of the page.


I mounted the photos on a pale blue sheet of card and ready to be placed into the centre of the page. Before sticking down the photos however, I added a checked blue die cut shaped card from the Burliegh Blue capsule collection. One of these was placed vertically to the right and the other horizontally to the left of where the photo was to be placed. I then added the photo.

I added cut strips of ribbon to both the left and right at the bottom of the page and secured these with staples I then added some embellishments I had left over from the Lucy Cromwell Papermania collection. these included wellies, a sentiment strip, watering can and bird boxes all on a garden theme, which I felt suited the page. 


To the right of the photo I added a journalling patch and at the base of the photo some Papermainia flowers from the Burliegh collection. Finally I added the title. I had thought to put ' Have Axe will travel' but changed it to Take one Axe.  

Thursday, 14 June 2012

Scrapology Challenge Win

I am so thrilled I have just been informed that I have won the Scrapology Scraplift  Challenge for May. All week I have been feeling decidedly yucky with an awful cold courtesy of my hubby and his germs he brought back from one of his conferences. I haven't done any crafting and sadly missed my month paper crafters meeting, but now feeling better I decided to update my blog and what did I find waiting for me but the news of my win. Thanks so much Scrapology Design team I am most chuffed.

The winning page


Saturday, 9 June 2012

Sitting Pretty


Well I have got yet another two pages completed for my daughters book .My trouble has been picking the best shots which capture her. The first page was taken at an official photographers just after her Christening. I love this shot because she looks so proper . The photographer posed her and she just kept the pose   throughout it was so sweet. Now a days she'd be fidgeting about the whole time or pulling daft faces.


I love the page the photography however really doesn't do it justice


For this page I have used a variety of media paint, card, ribbons, braid, die cuts, charms, gems, dusty attic cut outs and Angelina fibres. I really like the overall effect, I think the purple and gold give the official type pose a sort of regal quality you know like an old gallery painting.

Four years later and the real pose is gone though that look is still there. This photo was taken at a venue called 'Happy Landings' which has long since disappeared. In this picture Bryony was getting ready to cut her Hunchback of Notre dame cake  


For this page I used a basic blue background paper and mounted the photo on some coordinating paper from my stash together with some ribbons I then created some windmills from from some new Stampin Up paper I acquired. This paper I believe has the lovely name 'twitterpatted'. I also made up some bunting from oddments of the same paper plus some scraps I had in my 'small bits stash'. I know I'm awful I save even small bits of paper  just in case especially if they are pretty,.    


I hope Bryony likes them